
One day my front audio jack suddenly stopped working. After trying several methods, I finally resolved the problem with one of the methods below (see Method 3). But not everyone is in the same situation. It’s recommended you try all methods one by one until the problem is resolved.
Five methods are included below to fix your front audio jack not working issue. Try them one by one from the top of the list until you find the one that works for you.
Method 1: Test your headphones on another device
Method 2: Update the audio driver
Method 3: Check Realtek Audio Console settings
Method 4: Change default audio device
Method 5: Try the rear audio jack
Method 1: Test your headphones on another device
When you can’t hear sound from your headphone jack, the first thing you should do is check your headphones. If the problem is due to your headphones, all below methods won’t work for you.
If possible, use your headphones on another computer. Or use your headphones on your mobile phone. If it works on another device, it means your headphones have no problems. Then you can try other methods to fix the problem.

Method 2: Update the audio driver
The front audio jack not working issue can be caused by outdated audio drivers. So to fix the problem, you can try to update your audio driver. Two ways are available for you to update your audio drivers:
Way 1: Download and update the audio driver from the motherboard manufacturer
You can download the latest audio driver from the motherboard manufacturer. Before you download the driver, you need to find out what motherboard you have. Regarding how to check the motherboard model, you can follow the steps in How to Check What Motherboard You Have.
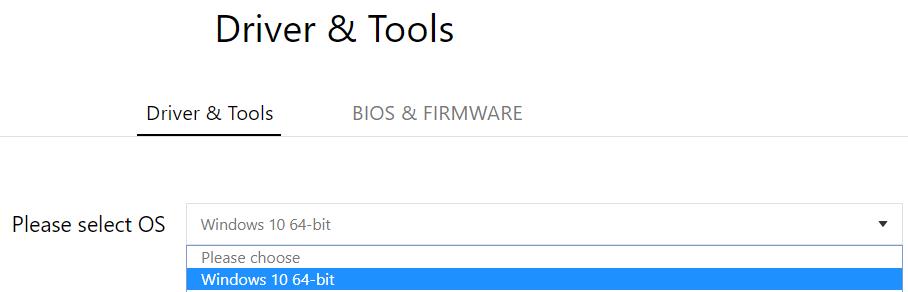
Once you get the motherboard model,go to the manufacturer’s website to download the driver. In my case, my motherboard model is TUF B360M-PLUS GAMING S. I downloaded the audio driver with the steps shown as below. You can refer to the steps to download your audio driver.
1. Google with the keyword combination ‘motherboard model + driver’. Then select the right result from the top results (usually ranked No.1 or No.2).

2. Select OS then the available drivers will be listed.
3. Download the latest audio driver according to the version.
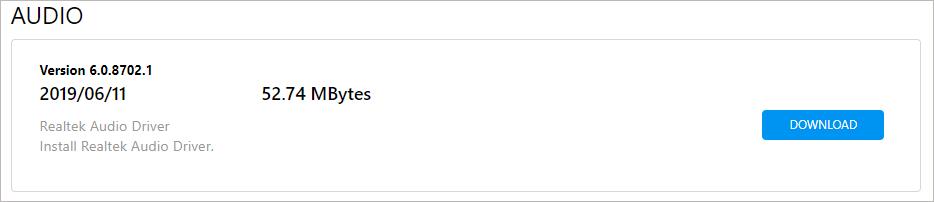
4. If the downloaded audio driver file is in EXE format, just double-click on the file and follow the instructions to install the driver. If the downloaded audio driver file is in ZIP format, extract the file first then double-click on the EXE file to install the driver.
5. After updating the driver, check to see if the front audio jack works.
Way 2: Update the audio driver with a third-party tool
If it’s not easy for you to download the driver manually, you can use a third-party tool to update the driver automatically. Most third-party driver updaters allow you to update drivers easily with a few clicks. Then you don’t need to know what your motherboard is, and you don’t need to have any driver knowledge.
You can search online for a quality driver updater. Every driver updater has their pros and cons; just find a driver updater that satisfies your needs.
After updating the audio driver, check to see if the front audio jack works.
If updating the audio driver doesn’t resolve the problem, try Method 3.
Method 3: Check Realtek Audio Console settings
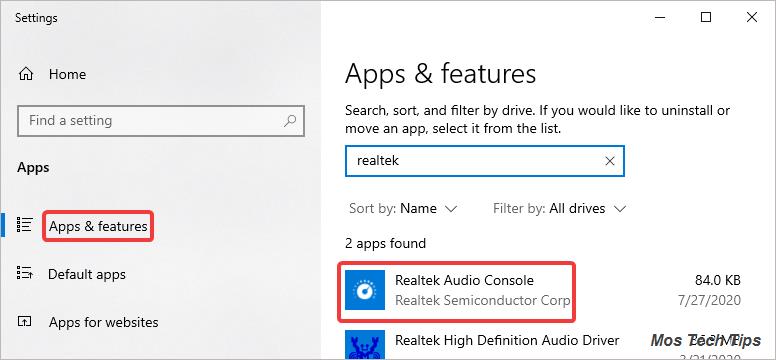
For Realtek audio card users (If you’re not sure what audio card you have, follow the steps in What Sound Card Do I have?), you can check the settings in Realtek Audio Console/Realtek Audio Manager. The wrong settings in Realtek Audio Console/Realtek Audio Manager can cause the front audio jack not working issue. In my case, this was the cause.
Realtek Audio Console is usually installed along with the Realtek audio driver. But you may want to check if it’s installed on your computer. You can go to Apps & features to have a check. If it’s missing on your computer, you can download it from Microsoft Store.
Then refer to these steps to check Realtek Audio Console settings.
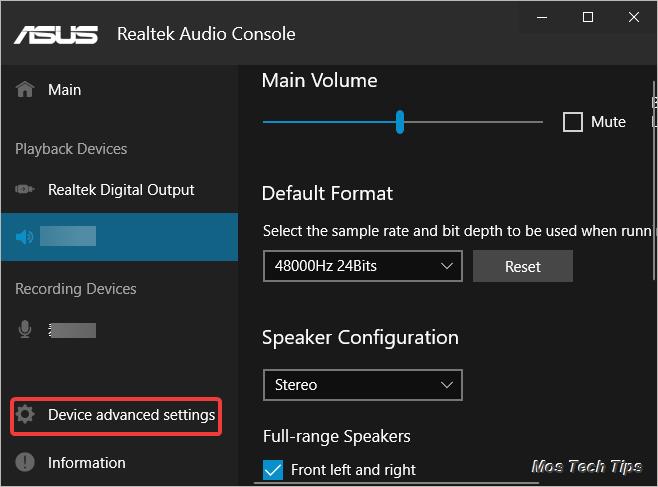
1. Open Realtek Audio Console.
2. Select Device advanced settings
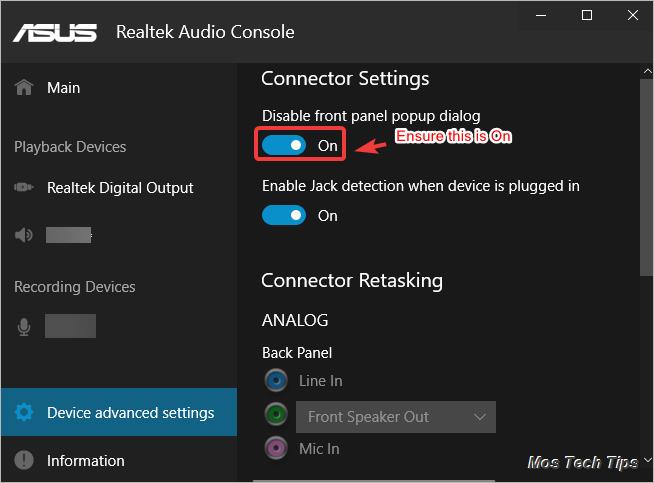
3. Ensure the option Disable front panel popup dialog is On (in Realtek Audio Manager, the option is Disable front panel jack detection). If it’s Off, click the toggle button to turn it on, then check to see if the front audio jack works. If the problem still persists, you may want to change the default audio device (see Method 4).
Method 4: Change default audio device
If the front audio jack is not set as the default audio device, it won’t work properly. So check the default audio device and change it if necessary. To do so:
1. Right-click on the speaker icon in the system tray and select Sounds.
2. Under the Playback tab, select the audio device for the front headphone jack, and then click on the Set Default button. Usually, Speakers/Headphones are for the front headphone jack.
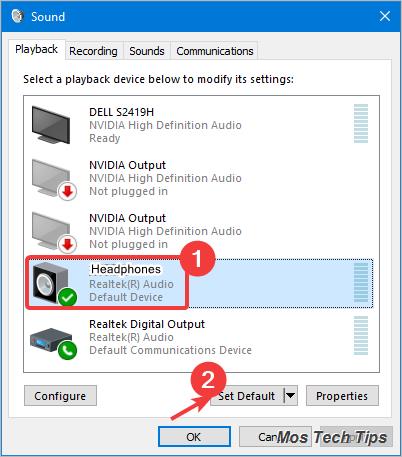
3. Click OK to save the changes.
4. Check to see if your front audio jack not working issue is resolved.
TIP: If you’re not sure which device represents the front headphone jack, follow the steps above to set all listed devices as default one by one.
Method 5: Try the rear audio jack
If none of the above methods resolves the problem, try the rear audio jack. If the rear audio jack works properly, the problem may be on the front audio jack. In that case, it’s recommended you contact the PC manufacturer for advice or take your computer to the near computer repair shop to have a further check.

Hopefully you can resolve your front headphone jack not working issue with the above methods. If you have any questions, ideas or suggestions, feel free to leave a comment below.

Thank you so much! Checking the “Disable front panel popul dialog” option in the Realtek Audio Console fixed the problem for me!
I’m glad that it helped you out!
Thank you so much!!!!!!! Checking the “Disable front panel popul dialog” option fixed all the problem !!!